Developer Guide
![]()


![]()

![]()
Table of Content
-
Introduction
1.1 Purpose
1.2 Using this Guide -
Setting Up
2.1 Setting up the project in your computer
2.2 Before writing code -
Design
3.1 Architecture
3.2 UI Component
3.3 Parser Component
3.4 Command Component
3.5 AnimeData Component
3.6 User Component
3.7 StorageManager Component -
Implementation
4.1 Estimate Feature
4.2 Browse Feature
4.3 View Anime Information Feature
4.4 Workspace Feature
4.5 Watchlist Management Feature
4.6 Add To Watchlist Feature
4.7 Remove From Watchlist Feature
4.8 View Anime In Watchlist Feature
4.9 Bookmark Feature -
Documentation, Logging, Testing, and DevOps
5.1 Documentation
5.2 Logging
5.3 Testing
5.4 DevOps
Appendix C: Non-Functional Requirements
Appendix D: Instructions For Manual Testing
1. Introduction
Welcome to AniChan!
AniChan is a free desktop command-line application aimed to improve the efficiency of anime translators. With AniChan, translators could manage and plan their time more effectively by identifying the time needed to translate a script. Moreover, AniChan comes with management features such as workspace, watchlist and bookmark that can help them stay organized and focused on their work.
AniChan is written in Java 11 and uses the Object-Oriented Programming (OOP) paradigm which provides us with means to structure a software program into organized and reusable pieces of codes, making it more efficient for future improvements and revisions.
1.1 Purpose
This document is for new and current developers of AniChan. It describes the overall architecture design of AniChan and lays out the current implementation details of our notable features with the rationale and considerations behind each one. It is a living document that will continue to be edited and updated with each major release. The current edition of this document is intended for the v2.1 release.
1.2 Using this Guide
Along the way you might encounter several icons. These icons will provide you with different types of information that you may find useful.
Take note when you see this icon, as it might tell you something important.
This icon represents a friendly tip that might be useful when using our application.
Lastly, text that is blue like this example, are clickable links that will bring you to the relevant part of this developer guide.
2. Setting Up
2.1 Setting up the project in your computer
Ensure that you have the following installed:
- JDK 11.
- IntelliJ IDE (highly recommended).
Firstly, fork this repo and clone a copy into your computer.
If you plan to use Intellij IDEA:
-
Ensure IntelliJ is configured to use JDK 11.
- If you are not at the welcome screen, click
File>Close Projectto close any existing project. - Click on
Configure>Structure for New Projects>Project Settings>Project, and ensure theProject SDKis using JDK 11.
- If you are not at the welcome screen, click
-
Import the project as a Gradle project.
- Click on
Import Projectand locate thebuild.gradlefile and select it. ClickOK. - If asked, choose to
Open as Project(notOpen as File). - Click
OKto accept the default settings but do ensure that the selected version ofGradle JVMmatches the JDK being used for the project. - Wait for the importing process to finish (it could take a few minutes).
- Click on
-
Verify the setup:
- After the importing is complete, locate the
src/main/java/anichan/Main.javafile, right-click it, and chooseRun Main.main(). If the setup is correct, you should see the following:
Welcome to AniChan! _ _____ _ /\ (_)/ ____| | / \ _ __ _| | | |__ __ _ _ __ / /\ \ | '_ \| | | | '_ \ / _` | '_ \ / ____ \| | | | | |____| | | | (_| | | | | /_/ \_\_| |_|_|\_____|_| |_|\__,_|_| |_| ------------------------------------------------------------- User: File does not exist. What's your name? - After the importing is complete, locate the
2.2 Before writing code
2.2.1 Configuring the Coding Style
If you are using IDEA, follow this guide IDEA: Configuring the code style to setup IDEA’s coding style to match ours.
2.2.2 Set up CI
There is no set up required as the project comes with GitHub Actions config files, located in .github/workflows folder. When GitHub detects these files, it will run the CI for the project automatically at each push to the master branch or to any PR.
2.2.3 Learn the Design
Before starting to write any code, we recommend that you have a look at AniChan’s overall design by reading about it at AniChan’s architecture.
3. Design
The following section describes the architecture design of AniChan. This section starts off by looking at the overall architecture design in a general view, before going into the specific implementation details of the individual features.
3.1 Architecture
This section will help provide insight to the general overview of AniChan’s architecture.
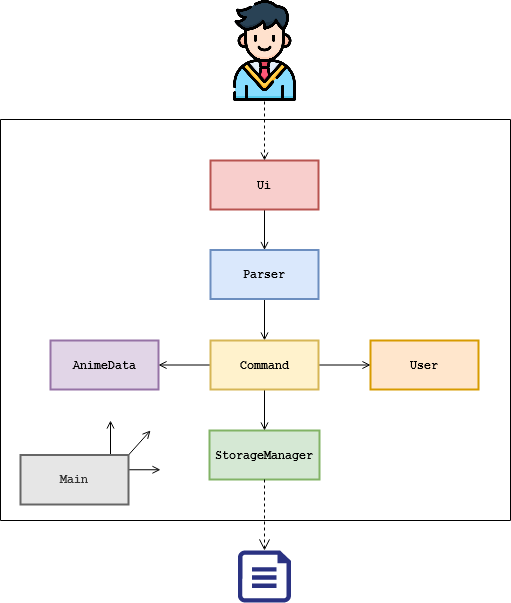
Figure 1: Architecture Design Diagram
docs/images/. If you wish to update a diagram you may replace the images in this folder.
The Architecture Diagram presented above explains the high-level design of AniChan, and given below is a quick overview of each component involved.
The Main class is the starting point of the application and has only one class called Main. It is responsible for:
- At launch: Initializes the various components in the correct sequence, connects them up with each other, and loads any saved data.
- At shut down: Shuts down the components and invokes any clean up methods where necessary.
The rest of AniChan consists of 6 components:
-
Ui: Manages the user interface of AniChan. -
Parser: Parses the user input. -
Command: Executes the command. -
User: Manages the workspace(s) and user data. -
AnimeData: Provides data from the anime source files. -
StorageManager: Reads data from, and writes data to, the hard disk.
Below are some example sequence diagrams to help illustrate the general program flow and how the different objects interact with each other.
The first sequence diagram below shows the program flow of starting AniChan as an existing user.
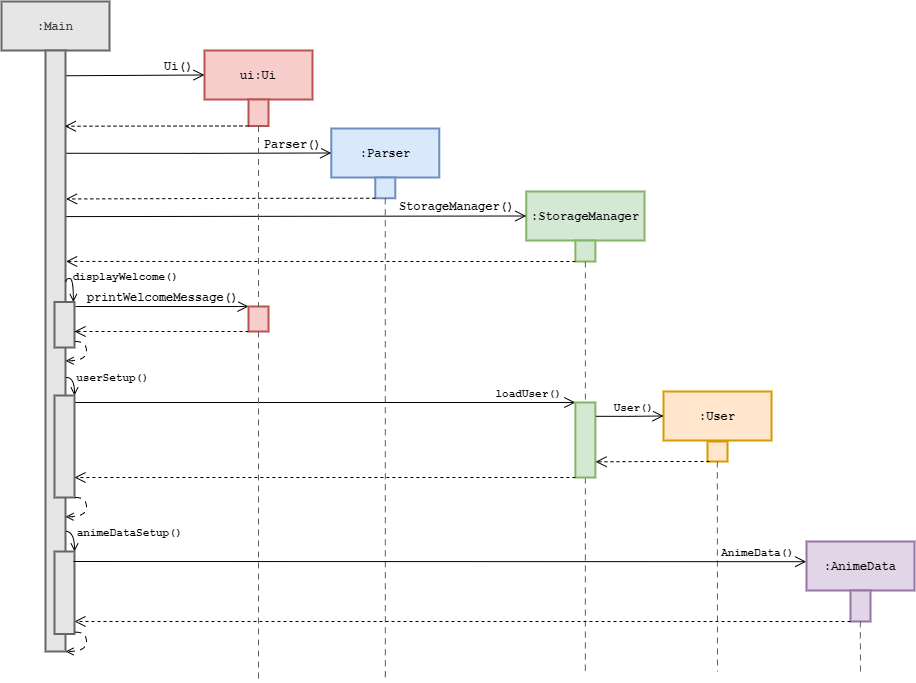
Figure 2: Starting Up Sequence Diagram
The next sequence diagram shows an instance of command execution.
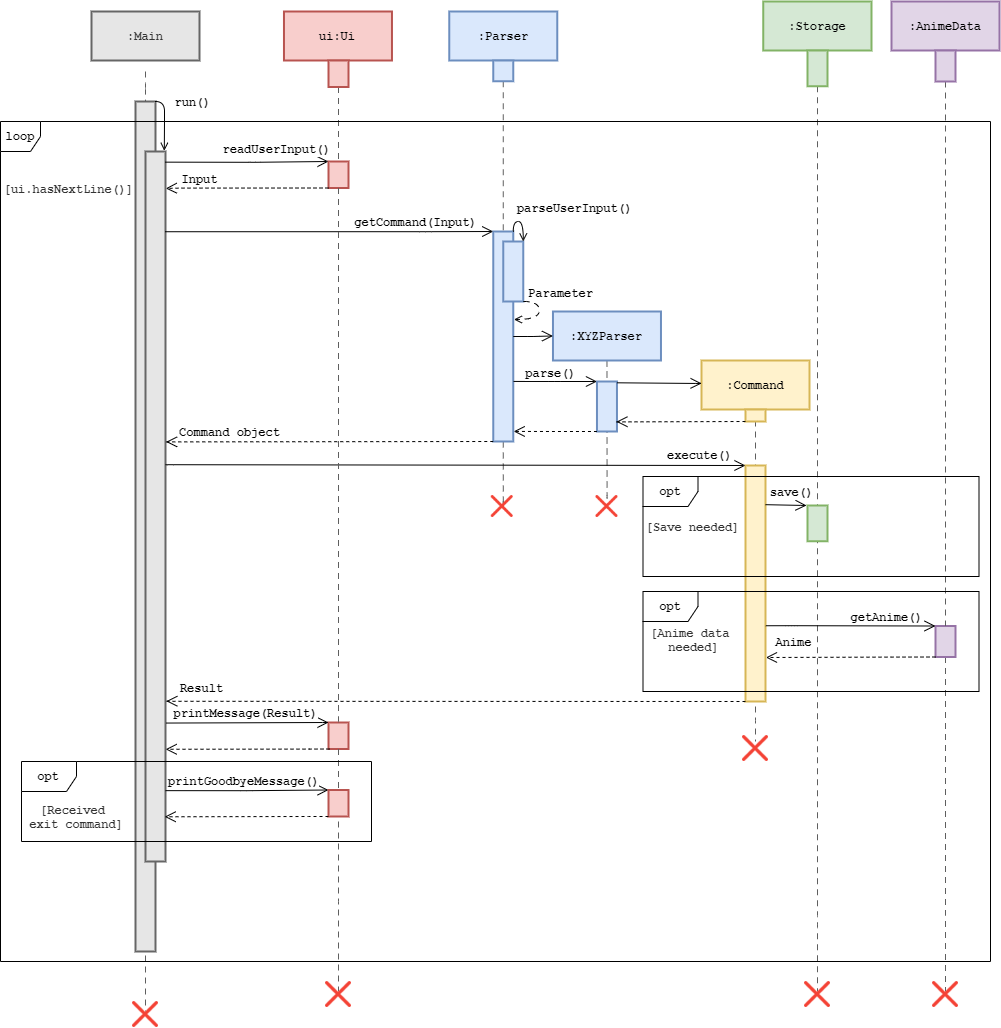
Figure 3: Command Execution Sequence Diagram
3.2 UI Component
Figure 4: Ui Class Diagram
The Ui component consists of a Ui class which handles all user input and system output. The Ui is only dependent on the Main class and does not interact directly with other classes, ensuring a high level of cohesiveness and separation of roles.
The Ui component actively listens for:
- the execution of commands to print the result of a
Command. - any exceptions thrown to show an error message to the user, instead of an unexpected program termination.
3.3 Parser Component
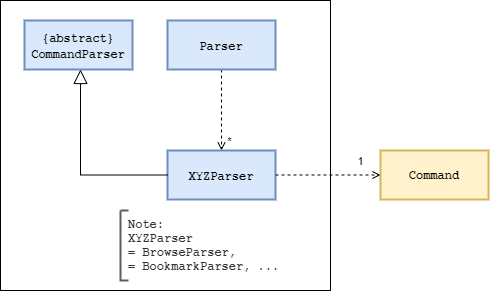
Figure 5: Parser Class Diagram
The Parser component consists of a Parser class and multiple XYZParser, each representing a specific command’s parser. The Parser class will first receive a user command from Main and will proceed to determine the command type.
Once the command type is known, it will then create the respective XYZParser class.
browseinput was parsed,Parserwill create a new instance ofBrowseParser.
The created XYZParser will then parse the parameter and perform input validations, before creating a Command object to return to Main.
3.4 Command Component
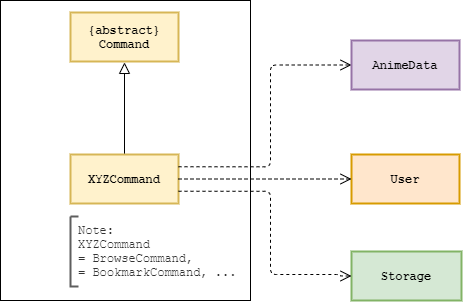
Figure 6: Command Class Diagram
The Command component consists of different commands, each represented by XYZCommand which inherits from the abstract Command class.
browsecommand would be represented by aBrowseCommand.
Main would utilise the Command#execute() operation to carry out the execution of the Command which will return a String output that will contain the successful result of the Command. If the Command was not successful, an exception will be thrown with details of the failure.
3.5 AnimeData Component
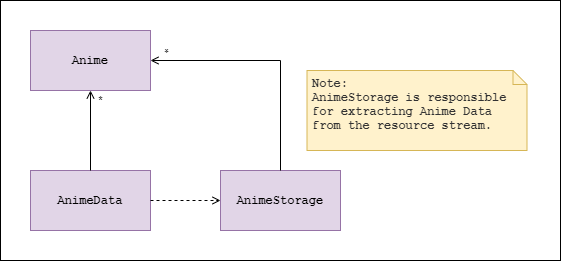
Figure 7: AnimeData Class Diagram
The AnimeData component is responsible for retrieving offline json data and parsing it into Anime objects that will be stored in program memory. The AnimeData will manage an ArrayList of Anime objects, providing AniChan with an interface for the program to retrieve the source data.
The AnimeData component:
- can retrieve
Animeobjects using their index. - can view detailed information of each
Animeobject. - can browse the
Animecatalog with sorting algorithms.
3.6 User Component
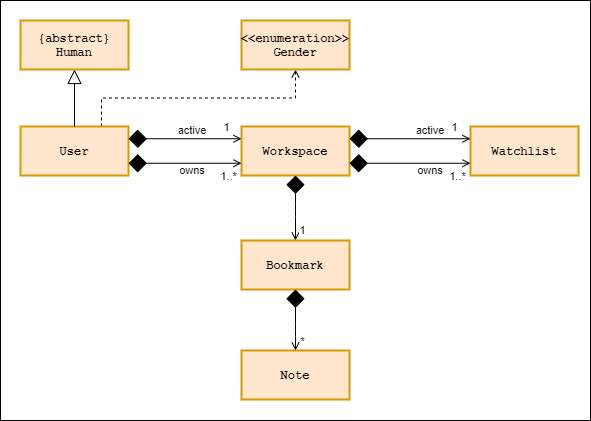
Figure 8: User Class Diagram
The User class inherits from the abstract Human class and stores the name and gender of the user. It represents the user’s interactions with Workspace class.
The Usercomponent:
- can provide user information such as
name,gender, andhonorific name. - stores an ArrayList of type
Workspace. - can add, set, and switch between workspaces.
The Workspace component:
- can allow
Userto create and get the list ofWatchlistandBookmark. - can allow
Userto change his activeWatchlist.
3.7 StorageManager Component
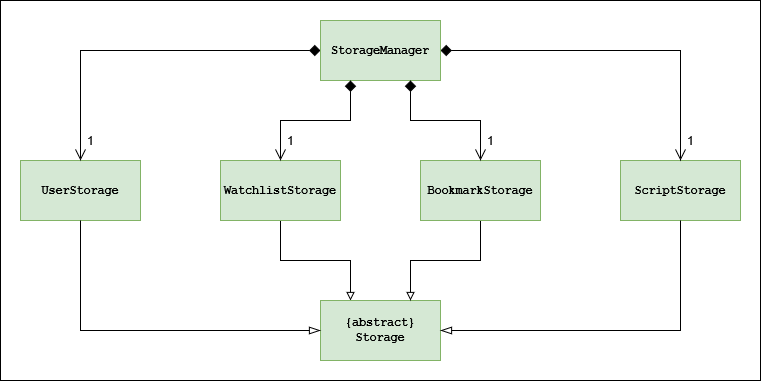
Figure 9: StorageManager Class Diagram
The StorageManager component:
- can save workspace created by the user as a folder.
- can save user, watchlist and bookmark data in
.txtformat and read it back using their respective storage class:UserStorage,WatchlistStorage, andBookmarkStorage. - can read script files that are in
.txtformat using the classScriptStorage.
AniChan saved these data as .txt files so advanced users will be able to view and manipulate these saved data easily with any available text editor.
4. Implementation
This section introduces the specific implementation details and design consideration of some features in AniChan.
4.1 Estimate Feature
The estimate feature aims to provide translators with better estimates on the time needed to translate a script based on their capability, or by the average translators’ capability. Hence, this feature allows users to better manage and plan their time.
4.1.1 Current Implementation
The estimate feature is facilitated by EstimateCommand. By running the command estimate with the relevant field (and parameter), EstimateParser will construct EstimateCommand which will be used to execute the user’s instruction.
Given below is an example usage scenario showing how the EstimateCommand behaves at each step.
Step 1: User executes the command estimate script.txt -wph 300. The application invokes Parser#getCommand() and because the command type is “estimate”, EstimateParser#parse() is invoked to parse, validate, and construct EstimateCommand with “script.txt” and “300”. The created object is then returned to Main.
Step 2: EstimateParser is terminated at this point. The application invokes EstimateCommand#execute() to execute the user’s instruction.
Step 3: EstimateCommand first invokes User#getActiveWorkspace() to identify the workspace the user is currently using, then it invokes StorageManager#loadScriptFile() to read scriptFileName (located in the active workspace folder) and store its content in fileContent.
Step 4: Once the file has been read, it calculates the estimated time using fileContent and wordsPerHour, then invokes EstimateCommand#timeNeededToString() to convert the estimated time into a human-readable format, and finally, returns the result to Main for it to be printed via Ui#printMessage().
wordsPerHourwas not specified, the values 400, 500, and 600 words per hour (average translator’s speed) will be used and this will generate 3 timings, unlike the current scenario, only 1 timing will be generated.
Step 5: EstimateCommand is terminated.
The sequence diagram presented below depicts the interaction between the components for running the command, estimate script.txt -wph 300.
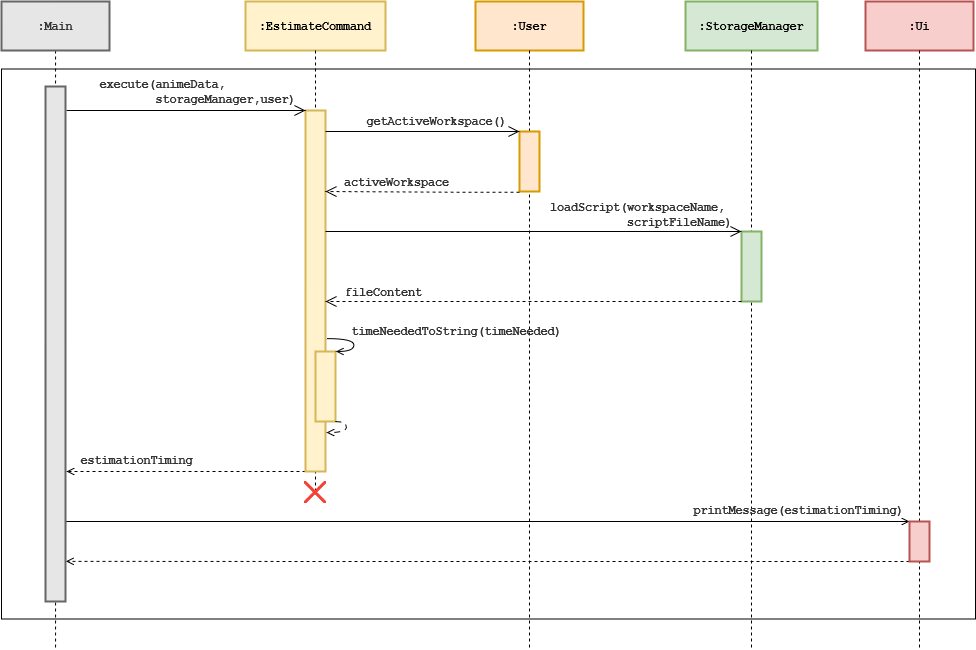
Figure 10: Sequence Diagram for estimate script.txt -wph 300
4.1.2 Design Considerations
This section shows the design considerations taken when implementing the estimate feature.
Aspect: When should the application validate the script file
Since the script file specified by the user can be non-existent or empty, it is important to determine when the application should validate the file to ensure efficient use of memory resource.
| Approach | Pros | Cons |
|---|---|---|
| During command execution. | Easy to implement since Command already handle file matters. |
Some memory resource are wasted if the file is invalid. |
| During parsing. | No memory resource wasted since invalid file will be detected early. | Decreases cohesion as Parser now has to handle file matters on top of parsing matters. |
Having considered both approach, we have decided to implement the first approach, validate the script file during command execution because we do not want to decrease the cohesion of Parser, and we find that the memory resource wasted is a worthy exchange for the cohesion preserved.
Aspect: The way user can specify the script file
As the user have to specify a script file for the command, there is a need to decide on whether the user needs to include the file extension as well.
| Approach | Pros | Cons |
|---|---|---|
| Have to specify file extension. | Ensures the correct file will be read. | May affect usability as some user may not know how to identify the file extension and might find it troublesome. |
| Do not have to specify file extension. | Users can easily specify the file to read. | May read the wrong file due to identical names but different file extension. |
We have decided to implement the first approach, users should specify the file extension because if the wrong timing is provided to the user, it could end up being a costly mistake. In addition, we also find that this accuracy we are assuring our users far outweighs and compensate for the slight inconvenience introduced.
4.2 Browse Feature
The browse feature is a useful feature that will allow users to quickly look through all the different anime series available in a browsing fashion.browse is also able to sort the order of how anime are displayed either in alphabetical order or by the anime’s rating.
4.2.1 Current Implementation
The BrowseCommand is executed by BrowseCommandParser after parsing the user input. It will then fetch Anime objects matching the parameters specified by BrowseCommandParser that are stored in AnimeData. It extends the Command class and implements the following operations:
-
BrowseCommand#sortBrowseList()- Handles any sorting ofAnimeobjects. -
BrowseCommand#buildBrowseOutput()- Creates the output string to be printed to users.
Given above are the two fundamental operations that will carry out the execution of a browse command.
If no additional parameters is provided, BrowseCommand will be constructed with default values. This ensures it will still perform the default browse and return a page of anime series that may be useful.
Before going any further, please refer to this helpful table of the BrowseCommand parameters for reference. These are the attributes that will define the scope of a browse command.
| Attribute | Value | Function |
|---|---|---|
| order | 0 | Ascending |
| order | 1 | Descending |
| sortType | 0 | No Sort |
| sortType | 1 | by name |
| sortType | 2 | by rating |
| sortType | 3 | back to original |
| page | >= 1 | page number |
Given below is an example usage scenario to showcase how a BrowseCommand will behave at each step. This example will utilise a small sample list of AnimeData and a page size of 3.
20as the default in the actual program.
Step 1: When the user enters the command for browse, the input will be processed and parsed by Parser before being further parsed by BrowseParser.
Step 2: Upon completion of parsing and input validation, BrowseParser will create an executable BrowseCommand object and return it to Main.
Step 3: Once the BrowseCommand object finishes its execution, it will first process the AnimeData by calling on its BrowseCommand#sortBrowseList() operation to identify the order that the list will need to be in (if any).
For this case, since it is a default browse operation, there will be no sorting performed.
Step 4: Now BrowseCommand will utilise its BrowseCommand#buildBrowseOutput() operation to access all Anime objects within the page window, as shown in the diagram below.
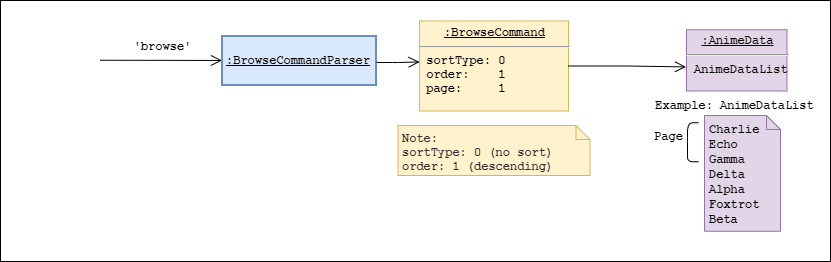
Figure 11: Browse Default State Object Diagram
In this example, it fetches the following Anime objects.
Charlie
Echo
Gamma
If the 2nd page of the list was requested instead using the input browse -p 2. BrowseCommand#buildBrowseOutput() will shift its page window down by 1 page as depicted in the diagram below.
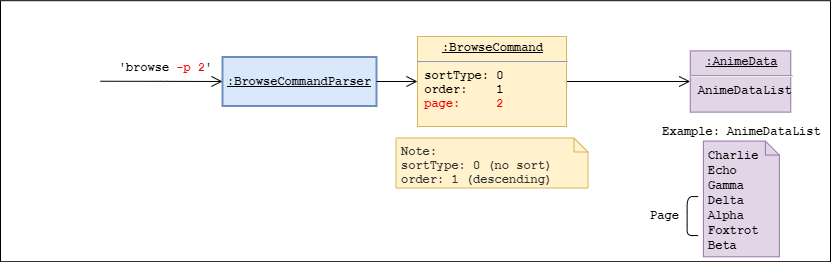
Figure 12: Browse Next Page Object Diagram
Step 5: For each Anime object, it will access the Anime object’s methods to get the relevant information about that anime series and construct a printable result for the user to view.
Step 6: After all Anime objects in the page window have been retrieved, it will return the printable result back to BrowseCommand#execute(). At this point, it will utilise BrowseCommand#sortBrowseList() again to reset the AnimeData list to its original form if it has been altered.
Step 7: Once AnimeData has been sorted, it will return the result back to Main for printing.
Currently, this result is not very exciting as it is just based on the Anime object ID which is assigned randomly by our data source, AniList.
A more interesting example scenario would be browsing the 2nd page of a sorted list in ascending order. The only step that would change would be at Step 3, where it will perform sorting of AnimeData list.
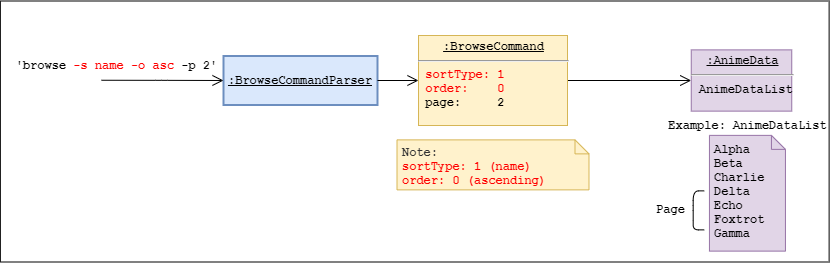
Figure 13: Browse Sorted State Object Diagram
As you can see, even though the page window is at the same position as the previous command, the list is now different as it has been sorted.
From this point on, the operation will continue as per the steps above, but during the final BrowseCommand#sortBrowseList() call in step 6. It will perform a sort to reset the list.
Here is the sequence diagram to better illustrate the lifecycle of a browse command upon its execute() call.
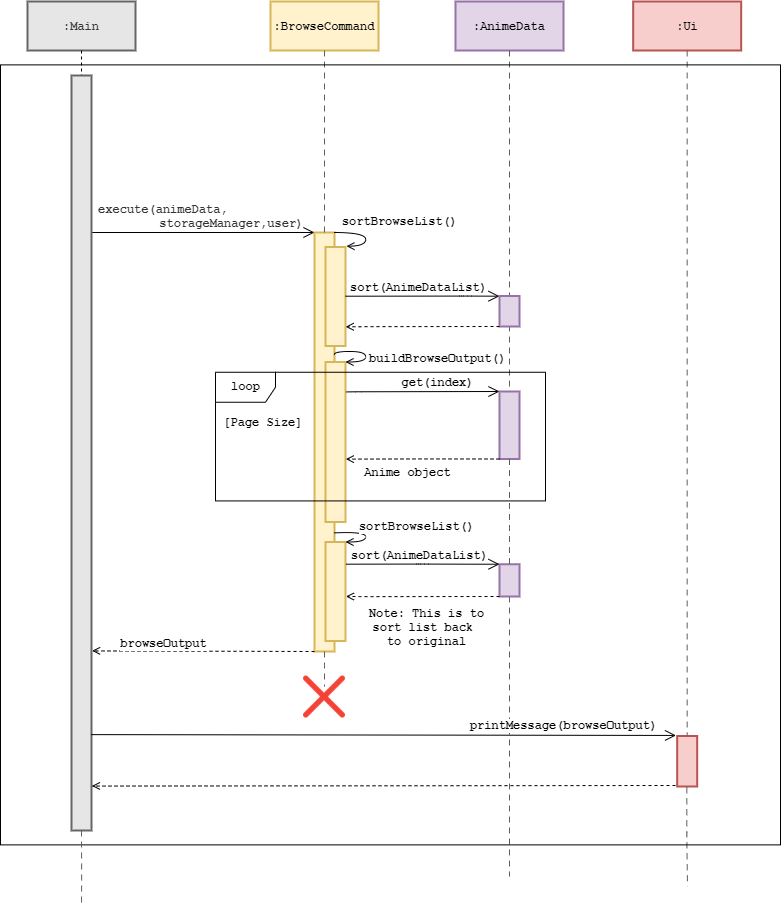
Figure 14: Browse Sorted Sequence Diagram
4.2.2 Design Consideration
Here are some various design considerations that was taken when implementing the browse feature.
Aspect: How should the program handle the sorted list
Since browse would require a sorted list, it is important to identify a suitable way to sort the list so that it does not affect the original list and have low complexity.
| Approach | Pros | Cons |
|---|---|---|
| Leaving the list unsorted. | - No complexity at all and is the fastest approach. | - List will be unsorted and may cause confusion to users and other operations. |
| Resorting the list again. | - The list will be back into its original form before browsing. | - May hinder performance as resorting could take time. - Requires altering of the main list. |
| Cloning a duplicate list to sort. | - The list will be back to its original form. - The main list will not be affected at all. |
- Expensive operation that will require large storage and time complexity. |
We have decided to implement the second approach of resorting the list because it is important to have the original order of the list to ensure that other operations will not be affected by browse. This approach also is the most cost-effective method that will not incur too many expensive memory usage and complex operations.
Aspect: Should the program use an interactive or static browsing approach
Since browse will access anime series in pages, it is important to decide the way users can access or ‘flip’ through different pages.
| Approach | Pros | Cons |
|---|---|---|
Interactive browsing, users can flip pages and pick to view specific anime. |
- Fluid and seamless browsing session. - Very good usability and interactivity. |
- Would require BrowseCommand to constantly get user input. |
| Static browsing, users specify the page they want to access. | - Completely decoupled from Ui component. - Allows for browse to be more precise in finding what the user wants. |
- Not as seamless as the first approach but still usable. |
We have decided to implement the second approach of having static browsing which users specify the page he wants to access. This is because it was important for the project to be OOP and this approach was a good fit for that requirement. This approach also allows for users to access different pages quickly, meaning more experienced users will be able to utilise it quicker than the first approach.
4.3 View Anime Information Feature
The info command allows the user to view all the relevant information regarding a specific anime that the user specifies. This allows them to know more about a particular anime.
4.3.1 Current Implementation
The view information command is currently implemented by the InfoCommand. The user has to give an input of the form info <ANIME_ID>, and this would allow users to check all the information available for the ANIME_ID they have specified.
Given below is an example of the usage scenario of view information command and how it behaves at each step.
Step 1: Ui would receive input in the form of info <ANIME_ID> in the Main class and pass it into Parser class.
Step 2: The Parser class would then extract out info from the input given, which will instantiate a new InfoParser object.
Step 3: The InfoParser#parse() method will be invoked, and this will validate the field given by the user.
Once validated, a new InfoCommand object will be constructed with the ANIME_ID.
InfoCommand object will be returned back all the way to Main. InfoParser is then terminated.
Step 4: Main will then call InfoCommand#execute(). In here the ANIME_ID will be validated and AnimeData#returnAnimeInfo() method is invoked, returning a string containing information regarding that particular ANIME_ID.
Step 5: The string is returned all the way back to Main and printed out by Ui.
Step 6: InfoCommand is terminated.
The diagram below is the sequence diagram from steps 4 onward.
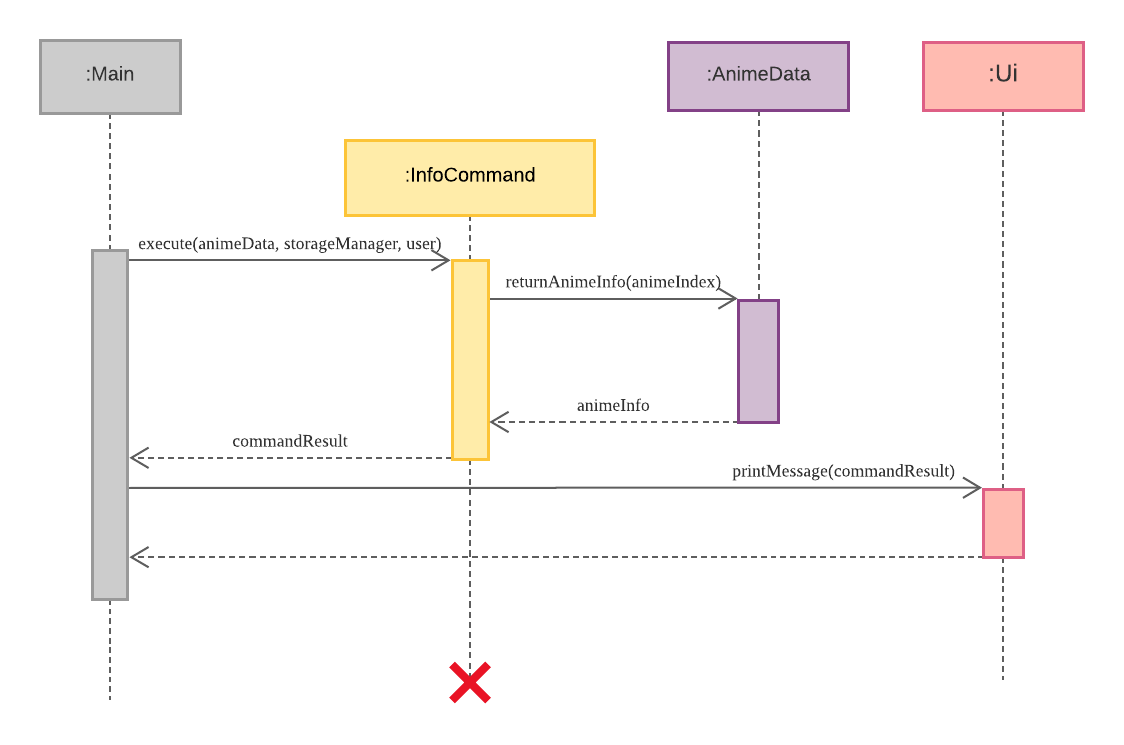
Figure 15: Info feature steps 4 to 6 sequence diagram
4.3.2 Design Consideration
This section shows the considerations taken when designing this feature.
Aspect: Using anime title or Anime ID
The user may at some point want to know more about a particular anime, in which he may or may not know the full title of the anime. It is therefore important to decide on whether to prompt users to give the title of the anime, or just give its ID.
| Approach | Pros | Cons |
|---|---|---|
| Use anime title as input. | - Easier for users who know anime titles. | - Users will have to input the full anime title. - The program has to search through the whole list of anime data. |
| Use anime ID as input. | - Users will only need to input one single integer. | - Users will have to search for the anime ID if they do not know the ID. |
We decided to go with the second approach, as it would enhance the user experience of not having to key in the full anime title. It would be very frustrating for the user as well if he misspells the title.
At the same time, using anime ID as input would allow the program to be able to retrieve the full anime information much quicker, instead of having a title to search against the whole data of anime to retrieve information.
4.4 Workspace Feature
Similar to a desktop, AniChan has a workspace feature which allows users to organize data in separate containers and switch between them to avoid intermixing of information.
Workspace is primarily the layer of code that sits between the user, and the rest of AniChan data management features (e.g. Watchlist, Bookmark).
As such, most of the code that manages Workspace can be found in User.java and Workspace.java.
Defaultis created. A similarly named folder will also be created in/datadirectory, managed by ourStorageclass.
4.4.1 Current Implementation
| Command Option | Workspace Command | Description field |
|---|---|---|
-n |
WorkspaceCommand#createWorkspace() |
Creates new workspace |
-s |
WorkspaceCommand#switchWorkspace() |
Switches to specified workspace |
-l |
WorkspaceCommand#listWorkspace() |
Lists existing workspace(s) |
-d |
WorkspaceCommand#deleteWorkspace() |
Deletes specified workspace |
The WorkspaceCommand is instantiated by WorkspaceParser, and it requires 2 parameters:
-
commandOption(mandatory). -
workspaceName(mandatory unless option-lis specified).
Given below is an example usage scenario showing how the command behaves at each step when the user tries to create new Workspace:
Step 1: User launches the application for the first time. The User will be initialized with an initial Workspace named Default, and the activeWorkspace pointing to it and workspaceList ArrayList containing it.
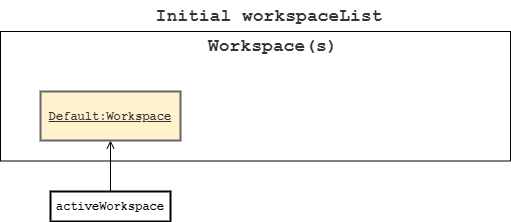
Figure 16: Workspace Command Initial State
Step 2: User enters the command workspace -n Netflix Animation Studio, the input will be processed and parsed by Parser and then further parsed by WorkspaceParser.
Step 3: Upon completion of parsing and input validation, WorkspaceParser will create a WorkspaceCommand object with the extracted commandOption and workspaceName parameter and return it to Main.
Step 4: Main calls WorkspaceCommand#execute() and it checks the commandOption before running WorkspaceCommand#createWorkspace() accordingly.
Step 5: WorkspaceCommand firstly calls User#addWorkspace() to add a new Workspace to User, then makes an empty ArrayList of Watchlist using User#setWatchlistList() for the User. Finally, it uses storageManager#saveWorkspace() to save the Workspace to disk.
Figure 17: Workspace Command After New Workspace Creation
Step 6: If successful, WorkspaceCommand returns the successfully created workspace message to Main.
Likewise, the operations to switch, list, and delete follows a similar execution process. The following diagrams will continue from step 6, and will illustrate the changes to the Workspace ArrayList.
Step 7: User keys in workspace -s Netflix Animation Studio to switch active workspace.
Figure 18: Workspace Command After Workspace Switch
Step 8: User keys in workspace -d Default to delete the workspace named Default.
Figure 19: Workspace Command After New Workspace Delete
The following sequence diagram illustrates how Workspace creation in the example above works:
-s,-l,-d) follows a similar process, only the list and switch option does not interact withStorageManagerandWatchlist.
Figure 20: Workspace Command After New Workspace Delete
4.4.2 Design Consideration
This section shows some design considerations taken when implementing the Workspace feature.
Aspect: How can Workspace be identified?
As most commands in WorkspaceCommand operates on an individual Workspace, there needs to be some way to identify each of them uniquely.
| Approach | Pros | Cons |
|---|---|---|
| Identify using a number ID. | Users can quickly switch and delete Workspace just by keying in a number. |
Operations like delete is irreversible and is not done often, accidentally keying in the wrong number can be catastrophic. |
| Identify using name. | If user remembers the name, he can easily switch/delete without using the List command first. |
User may waste time typing long workspace names. |
We have decided to use name to identify Workspace as it is more intuitive for the end-user.
This also avoids the need to maintain an integer ID for each Workspace.
Aspect: Workspace name restrictions
As Workspace is identified by their names, and other classes like Storage relies on the name to make folders for data storage purposes.
Should we allow the user full discretion to naming Workspace?
| Approach | Pros | Cons |
|---|---|---|
| Yes | Allows user more flexibility. | Confusing or unexpected names may lead to unexpected outcomes. |
| No | Eliminate unexpected names which could lead to unexpected outcomes. | Less flexibility and more code required to enforce. |
For example, a user may provide new workspace__ as a Workspace name, this may confuse the user in the future when he tries to list
all Workspace as the space characters are whitespaces. Hence, enforcing no extra whitespaces was implemented.
In addition, we also prevent case-insensitive Workspace creation, use of special characters, and long names (i.e. length above 30), as they may cause issues when creating folders on certain file systems.
Aspect: Loading Workspace on program start
As there needs to be an activeWorkspace set at all times for operations such as adding Watchlist. How do we determine which Workspace should be chosen if the User owns multiple Workspaces?
| Approach | Pros | Cons |
|---|---|---|
Scan from data folder and pick first result. |
Able to adapt to changes even if malicious or unexpected edits were made to file system. | User may need to switch to his favorite Workspace on each startup, if any. |
Store last used Workspace. |
User might gain some convenience of not needing to switch to his favorite Workspace. |
Prone to potential issues from the file system. |
We picked the first approach as it is the safer option. By allowing AniChan to scan and adapt to file system changes (e.g. User accidentally moves/renames/deletes Workspace on his hard drive), we avoid potential issues of relying on old information created in previous runtime which may hinder user experience.
4.5 Watchlist Management Feature
The watchlist management feature aims to provide translators with a simple way to keep track of anime by being able to group anime based on their own criteria. This allows them to stay organized and focused on their work rather than being concerned over irrelevant issues.
4.5.1 Current Implementation
The watchlist management feature is facilitated by WatchlistCommand. By running the command watchlist with the relevant parameter and field, WatchlistParser will construct WatchlistCommand which will be used to execute the user’s instruction.
Below is a table describing the 4 parameters supported by the watchlist command, and the corresponding method that is invoked (required parameters are omitted).
activeWatchlistinWorkspace.
| Parameter | Method | Description |
|---|---|---|
-n |
WatchlistCommand#createWatchlist() |
Creates a new watchlist |
-l (lowercase letter ‘L’) |
WatchlistCommand#listAllWatchlist() |
Lists all watchlist in the workspace |
-s |
WatchlistCommand#selectWatchlist() |
Selects a watchlist to be the new active watchlist |
-d |
WatchlistCommand#deleteWatchlist() |
Deletes a watchlist |
Given below is an example usage scenario showing how the WatchlistCommand behaves at each step. In this example, we will look at the watchlist creation process.

Figure 21: WatchlistCommand Initial State
Step 1: User executes the command watchlist -n NewAnime. The application invokes Parser#getCommand() and because the command type is “watchlist”, WatchlistParser#parse() is invoked to parse, validate, and construct WatchlistCommand with “-n” and “NewAnime”. The created object is then returned to Main.
Step 2: WatchlistParser is terminated at this point. The application invokes WatchlistCommand#execute() to execute the user’s instruction.
Step 3: WatchlistCommand first invokes User#getActiveWorkspace() to identify the workspace to add the new watchlist, and according to the instruction “-n”, WatchlistCommand#createWatchlist() is invoked.
Step 4: It first invokes activeWorkspace.getWatchlistList() to initialise watchlistList. A Watchlist object is then constructed with the name “NewAnime” and validated before it is added to watchlistList.
watchlistList, is not empty, and contains less than or equal to 30 alphanumeric characters and/or spaces.
Step 5: StorageManager#saveWatchlist() is invoked to save the updated watchlistList, and finally, the result of this command execution is returned to Main for it to be printed via Ui#printMessage().
Watchlistobject for a workspace will be saved in the file “watchlist.txt” in the workspace folder.
Step 6: WatchlistCommand is terminated.
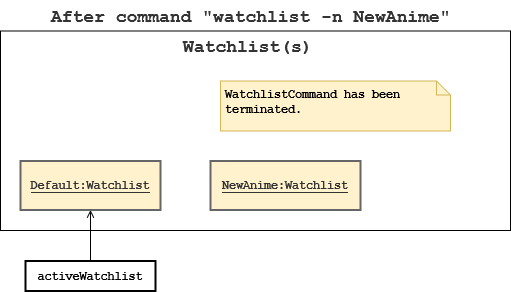
Figure 22: WatchlistCommand After Create State
All the other parameters in the watchlist command also follows a similar execution process.
The following diagrams will continue from step 6, and it will show how the activeWatchlist state will change as the watchlist command executes with the select (-s) and delete (-d) parameter.
-l) is not shown as it does not result in any change to theactiveWatchliststate.
Step 7: The user executes watchlist -s 2 to set the second watchlist (“New Anime”) in the list as the new active watchlist.
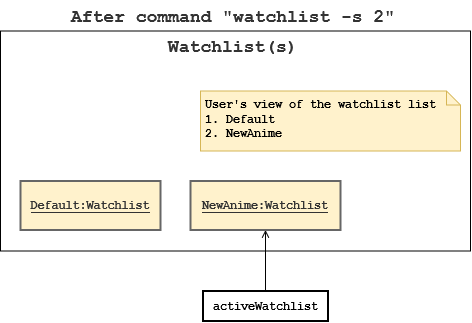
Figure 23: WatchlistCommand After Select State
Step 8: The user now decides that the “NewAnime” watchlist is no longer needed and decides to execute watchlist -d 2 to delete it.
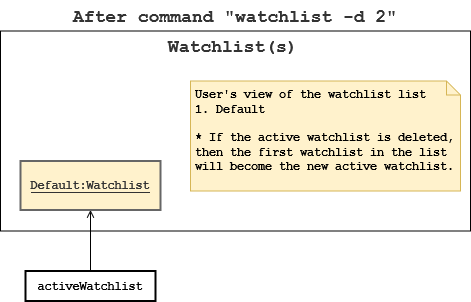
Figure 24: WatchlistCommand After Delete State
The sequence diagram presented below depicts the interaction between the components for running the command, watchlist -n NewAnime.
StorageManagersince they do not modify the watchlist data.
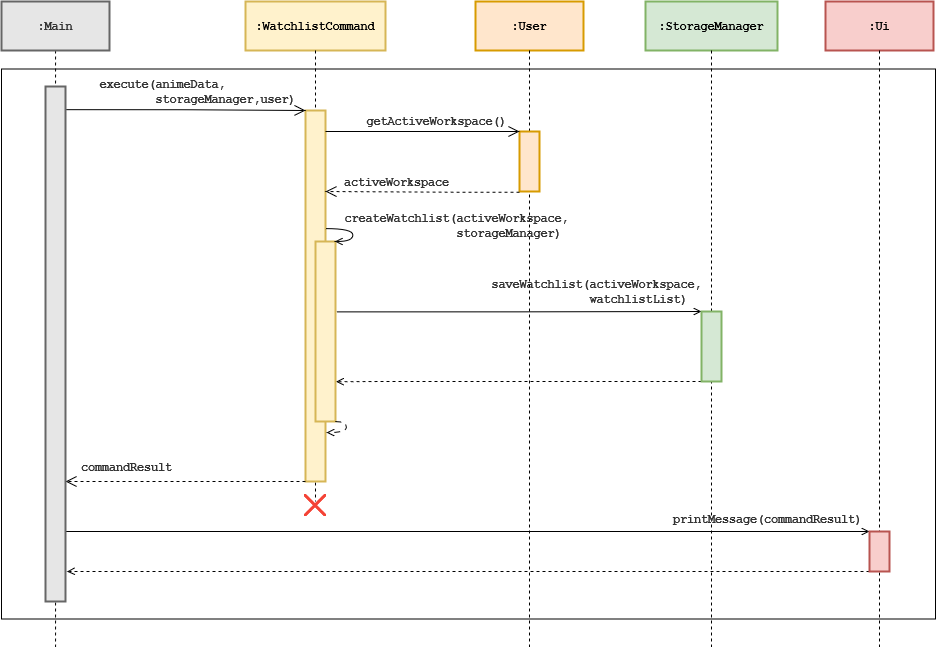
Figure 25: Sequence Diagram for watchlist -n NewAnime
4.5.2 Design Considerations
This section shows the design considerations taken when implementing the watchlist management features.
Aspect: Saving watchlist data
Since watchlist can be created and deleted at any point of time, it is important to decide on when the application should save the watchlist data.
| Approach | Pros | Cons |
|---|---|---|
| Whenever the watchlist data is modified. | Data would not be lost if the application or system crashes midway. | Application might slow down when the data grows large. |
| When the user exits the program. | Saving is more efficient and could improve performance. | User may lose their data if the application or system crashes midway. |
Having considered both approach, we have decided to save watchlist data whenever the watchlist data is modified because users may work on the application for long period and unexpected events can always happen. Losing work data can also be a frustrating and costly mistake to the user especially if the data are important.
Aspect: Watchlist name restriction
To create a watchlist, users would have to give it a name, and these names can affect the usability of the application in the long run. Hence, there is a need to decide on whether the watchlist name needs to be restricted to ensure it remains readable in the long run.
| Approach | Pros | Cons |
|---|---|---|
| No restriction. | Users have more flexibility. | This may hinder user’s vision of the input prompt and affects the usability. |
| Maximum of 30 alphanumeric characters and/or spaces, but cannot contain spaces only. | Ensure users have a easy to read input prompt. | Users have less flexibility in naming. |
While both approach are valid in their own ways, we have decided to restrict watchlist name to a maximum of 30 alphanumeric characters and/or spaces, but cannot contain spaces only because having a watchlist name that is lengthy or has special characters can muddle up the readability of the input prompt, and that can affect the usability of the application.
4.6 Add To Watchlist Feature
The add feature allows users to add an anime into the active watchlist. This helps them keep track of the anime they would like to watch next.
4.6.1 Current Implementation
The current implementation of the add to watchlist command requires the user to give an input in the form of add <ANIME_ID>.
This will allow users to add the ANIME_ID specified by calling the Watchlist#addAnimeToList() method in the active Watchlist object.
Add to watchlist command extends the Command class, and the parse method in AddToWatchlistParser class is being called to validate the parameter that the user has entered.
Below is an example usage scenario of how add to watchlist command behaves at each step.
Step 1: Starting from the Main class, the user first inputs add <ANIME_ID>. The input will be taken in by the Ui class, and passed into Parser through Parser#getCommand(userInput).
Step 2: The Parser class would then extract the add command out of the input and it will instantiate a new AddToWatchlistParser object.
Step 3: AddToWatchlistParser#parse() is then called by the Parser class. This will validate the field that has been given.
A new AddToWatchlistCommand object is instantiated with the specified ANIME_ID, and is returned back to Main class.
At this point, AddToWatchlistParser is terminated.
Step 4: AddToWatchlistCommand#execute() is then invoked in Main, which retrieve the active workspace through AddToWatchlistCommand#getActiveWorkspace(),
and Watchlist object from ActiveWorkspace#getActiveWatchlist().
Step 5: Watchlist#AddAnimeToList() will then be called, passing in the anime index. This will then add the anime index into the
ArrayList of integers storing all the anime in that Watchlist.
Step 6: commandResult will then be passed back to Main to be printed out by Ui, and AddToWatchlistCommand is terminated
For better illustration, Figure 28 below shows the sequence diagram of steps 4 to 6.
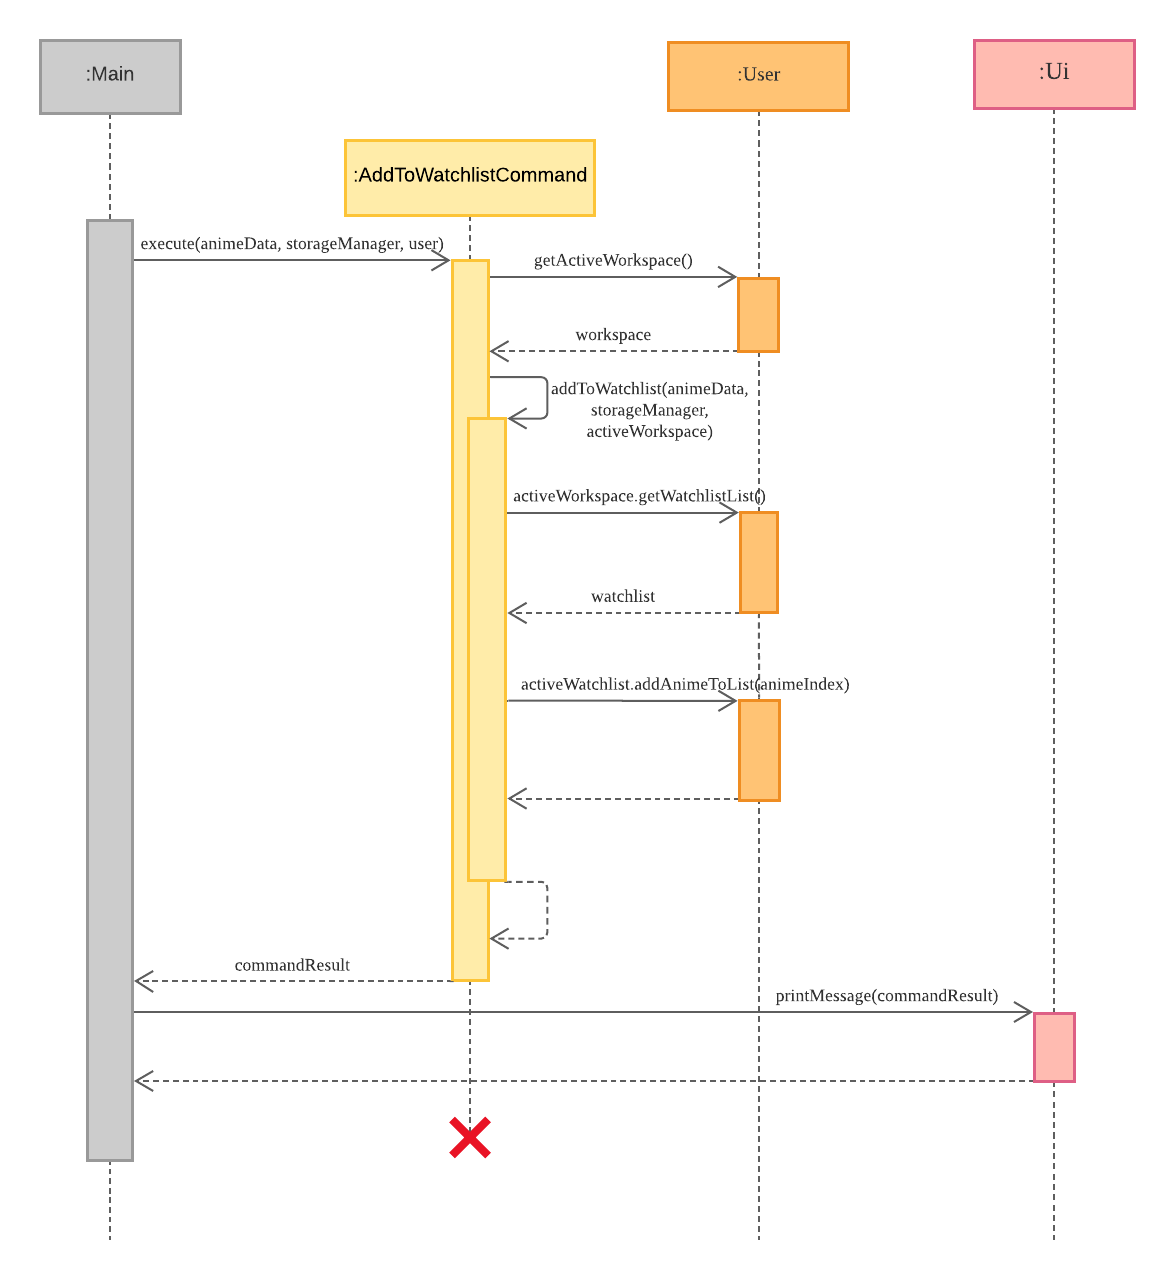
Figure 26: Sequence diagram for Add To Watchlist feature steps 4 to 6
4.6.2 Design consideration
Below shows the considerations taken when implementing the AddToWatchlist feature.
Aspect: Using anime title or anime ID
This consideration is similar to our info feature consideration, so below is the same table we find in our info feature section.
| Approach | Pros | Cons |
|---|---|---|
| Use anime title as input. | Easier for users who remember anime titles. | Users will have to input the full anime title. |
| Use anime ID as input. | Users will only need to input one single integer. | Users will have to search for the anime ID if they do not know the ID. |
Similarly, we decided to go with the second approach as this would be much easier for users to key in, and also faster for the program to find the anime the user wants to add into the watchlist.
4.7 Remove From Watchlist Feature
The remove from watchlist feature allows users to remove a particular anime from their currently active watchlist. This would allow them to keep their watchlist clean of the anime that they have watched, leaving only those that they have not watched.
4.7.1 Current Implementation
The remove from watchlist command currently requires the user to give an input in the format: remove <ANIME_ID_IN_WATCHLIST>. The implementation of remove from watchlist command is similar to the add to watchlist feature with the only difference being that the user has to delete the index of the anime in that watchlist, instead of the actual ANIME_ID.
The usage scenario of remove from watchlist is similar to the add to watchlist command, but we will be using RemoveCommand, RemoveCommandParser and Watchlist#removeAnimeFromList().
4.7.2 Design Consideration
This section describes the design considerations taken when implementing this feature.
Aspect: Which index to use when removing an anime
It is important to decide the what type of input that the user should give, given that they will frequently use the remove command to remove one, or multiple anime from his watchlist.
| Approach | Pros | Cons |
|---|---|---|
| Use anime ID in AnimeData as input. | - Easier for users who remember the anime ID as they added it in to the watchlist before. | - Users will have to search for the anime ID again in the event that he forgets it. - The program has to search through the whole list anime in the watchlist. |
| Use anime ID in Watchlist as input. | - Program can easily delete a particular index of an ArrayList | - Users will have to find out the anime index in the watchlist using the view command. |
We have decided to use approach 2 instead of 1, as it will not only will it be much faster for the program to delete one particular index instead of having to search through the whole list, it would be provide better user experience as the user will not need to search for the anime ID that he wants to remove in the case that he does not know the anime ID.
4.8 View All Anime in Watchlist Feature
Users can view the anime that they have stored in his active watchlist, or a specific watchlist, by using the view command. In doing so, they can easily check what anime they would like to watch next.
4.8.1 Current Implementation
The view command is currently implemented by the ViewWatchlistCommand. It is instantiated by Parser and executed by Main. This allows users to view all the anime currently inside a Watchlist object.
An example usage scenario on how view anime in watchlist behaves is given below.
Step 1: In the Main class, the user will input view [-v WATCHLIST_ID]. Ui will take in this input and is passed into Parser.
Step 2: In Parser, view will be extracted out of the input, leading to a new ViewWatchlistParser object being instantiated.
Step 3: ViewWatchListParser#parse() is then called in Parser.
If no parameter is given, then an empty constructor of ViewWatchlistCommand will be instantiated.
Otherwise, the parameter and field will be validated, and a constructor of ViewWatchlistCommand with WATCHLIST_ID is instantiated.
Step 4: The ViewWatchlistCommand object is then returned back to Parser, and back to Main. ViewWatchlistParser is terminated.
Step 5: The ViewWatchlistCommand#execute() would then be called by Main, in which the WATCHLIST_ID will be validated.
Step 6: ViewWatchlistCommand#buildAnimeInWatchlist() will build a string containing all the anime name inside the selected Watchlist, and it will be returned to Main, where it will be printed out by Ui.
Step 7: ViewWatchlistCommand is terminated.
The figure below is the sequence diagram for steps 5 to 7
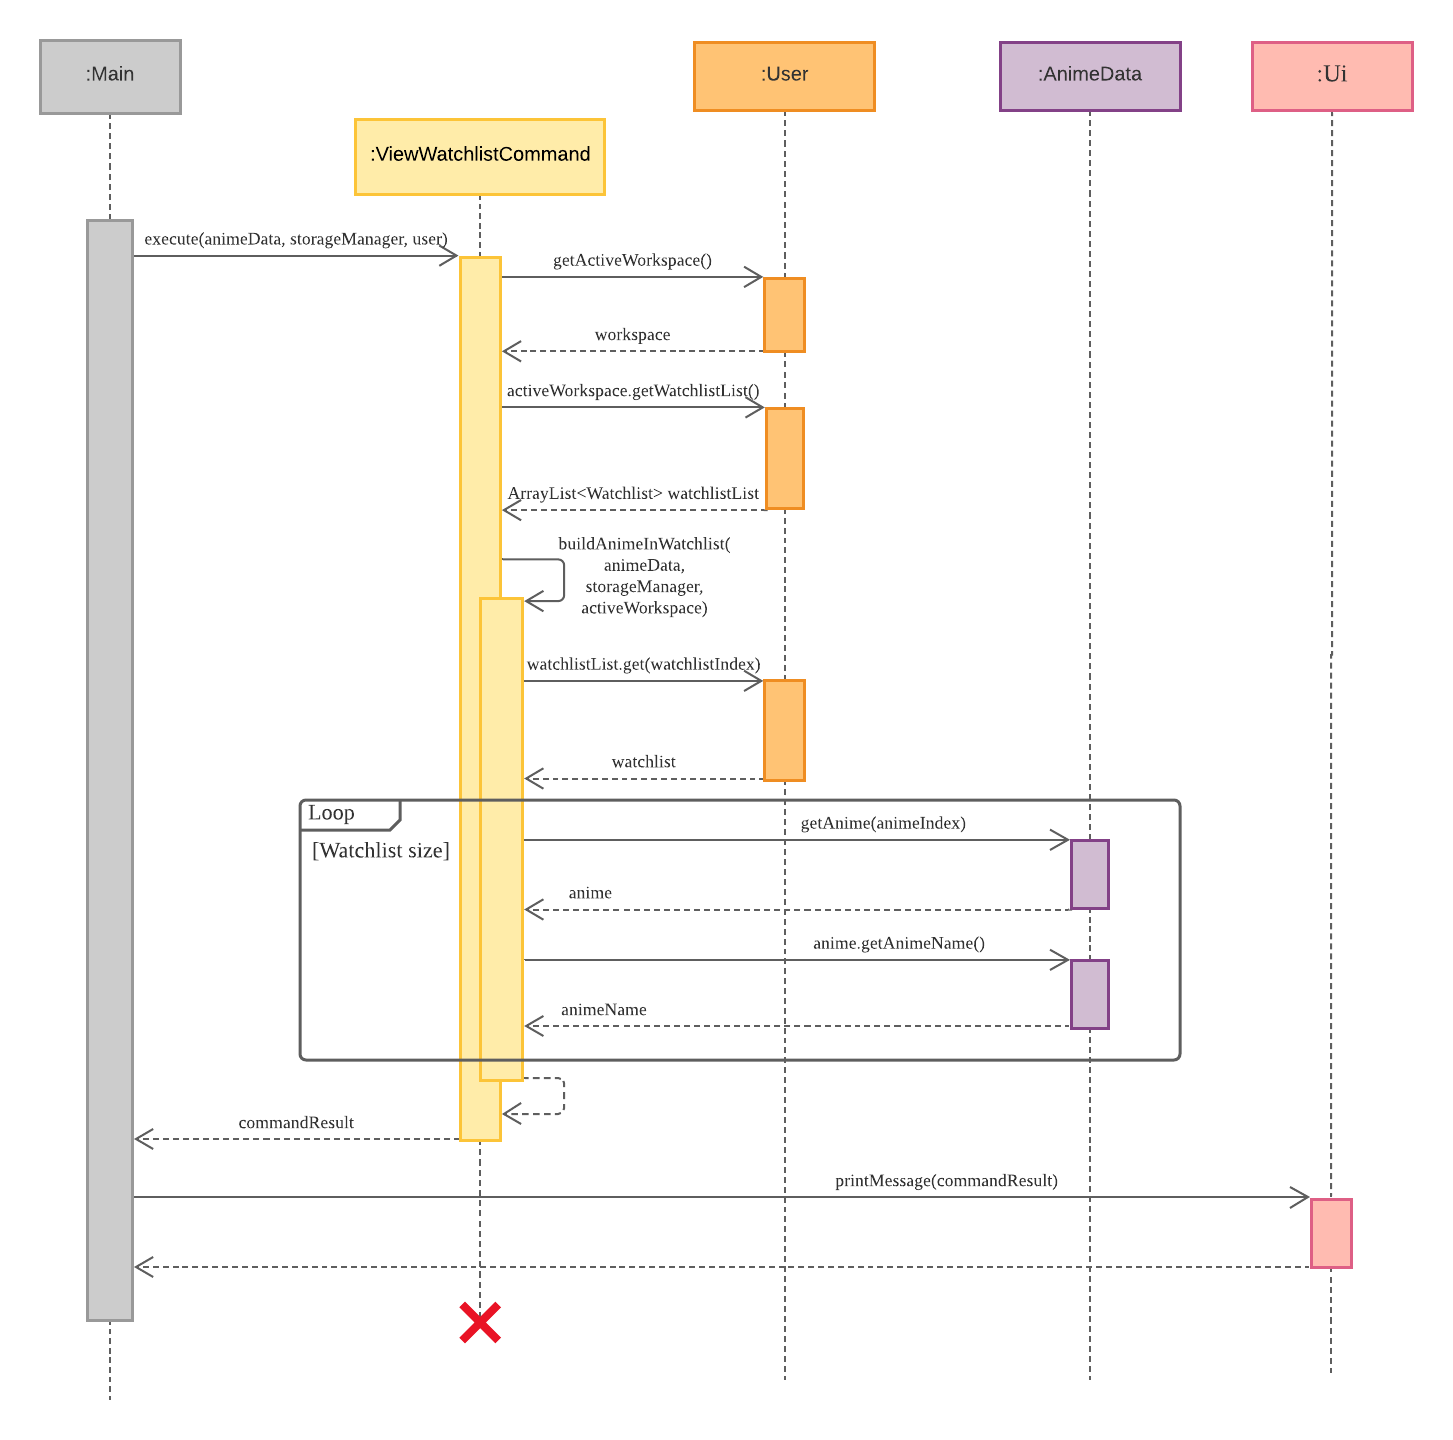
Figure 27: Sequence diagram for View Watchlist feature steps 5 to 7
4.9 Bookmark Feature
The bookmark feature aims to provide the user with the ability to create shortcuts to anime they wish to track. This feature further provides tools to monitor the progress of a series and make informative notes.
4.9.1 Current Implementation
The Bookmark class uses three ArrayList to store bookmark entries of the user, these ArrayLists maintain information about the anime index, episode and notes. The synchronisation between ArrayList is required so that it enables easy retrieval of bookmark information using the bookmark index on the three ArrayList.

Figure 28: Bookmark Class Diagram
BookmarkCommand is instantiated by BookmarkParser, and requires a mandatory BookmarkAction. With the BookmarkAction, the Parser will determine the required field for the BookmarkCommand. The table below shows the required field for each action.
| Bookmark Command | Bookmark Action | Required field |
|---|---|---|
| Add | a | Anime ID |
| Delete | d | Bookmark ID |
| List | l | Not required |
| Episode | e | Bookmark ID, Episode |
| Note | n | Bookmark ID, Note |
| Remove Note | r | Bookmark ID, Note ID |
| Info | i | Bookmark ID |
Given below is the example usage scenario and how the Bookmark command behaves at each step.
Step 1: User inputs command bookmark, the application then calls Parser#getCommand() and passes the command to it.
Step 2: BookmarkParser extracts “Bookmark Action” from the command, and based on the command type, it will determine the respective required field. The BookmarkParser is responsible for validating the input parameters and will throw an AniException when encountering unrecognised inputs.
For example: bookmark 2 -e 5, the parser will create BookmarkCommand and call the methods setBookmarkAction(“e”), setBookmarkIndex(2) and setBookmarkEpisode(5).
Step 3: The application calls BookmarkCommand#execute() and the command will use the BookmarkAction to do a corresponding validation check on the field before calling the Bookmark Operations.
Below is a list of bookmark operations:
-
Bookmark#addAnimeBookmark(): Adds theAnimeindex provided into the bookmark list. -
Bookmark#getListInString(): List all entries within theBookmarkusing theBookmarkindex together with theAnimename. -
Bookmark#deleteAnimeBookmark(): Remove theBookmarkindex provided from the bookmark list. -
Bookmark#editBookmarkEpisode(): Edit the current episode for a Bookmark entry . -
Bookmark#addNote(): Add a note for a Bookmark entry. -
Bookmark#removeNote(): Remove a note from a Bookmark entry. -
Bookmark#getAnimeInfoFromBookmark(): Retrieve the anime info on the anime ID kept at the specified bookmark entry. -
Bookmark#getBookmarkEpisode(): Retrieve the episode field for a Bookmark entry. -
Bookmark#getNoteInString(): Retrieve notes in a list within the specified bookmark entry.
Step 4: The user executes bookmark -a 430 command to add the anime ID: 430 into the bookmark. Bookmark#addAnimeBookmark() will then add the anime index to the ArrayList within the bookmark.
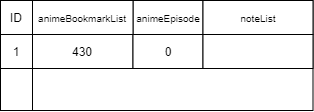
Figure 29: Bookmark Entry After Add
Step 4.5: The user executes bookmark -a 1 and bookmark -a 410 to add anime ID 1 and 410 to the bookmark.
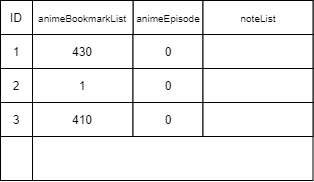
Figure 30: Bookmark Entries with more Add
The sequence diagram presented below depicts the interaction between the components for running the command, bookmark -a 430.
deleteBookmarkEntry()method and modify the bookmark entry usingBookmark#deleteAnimeBookmark().
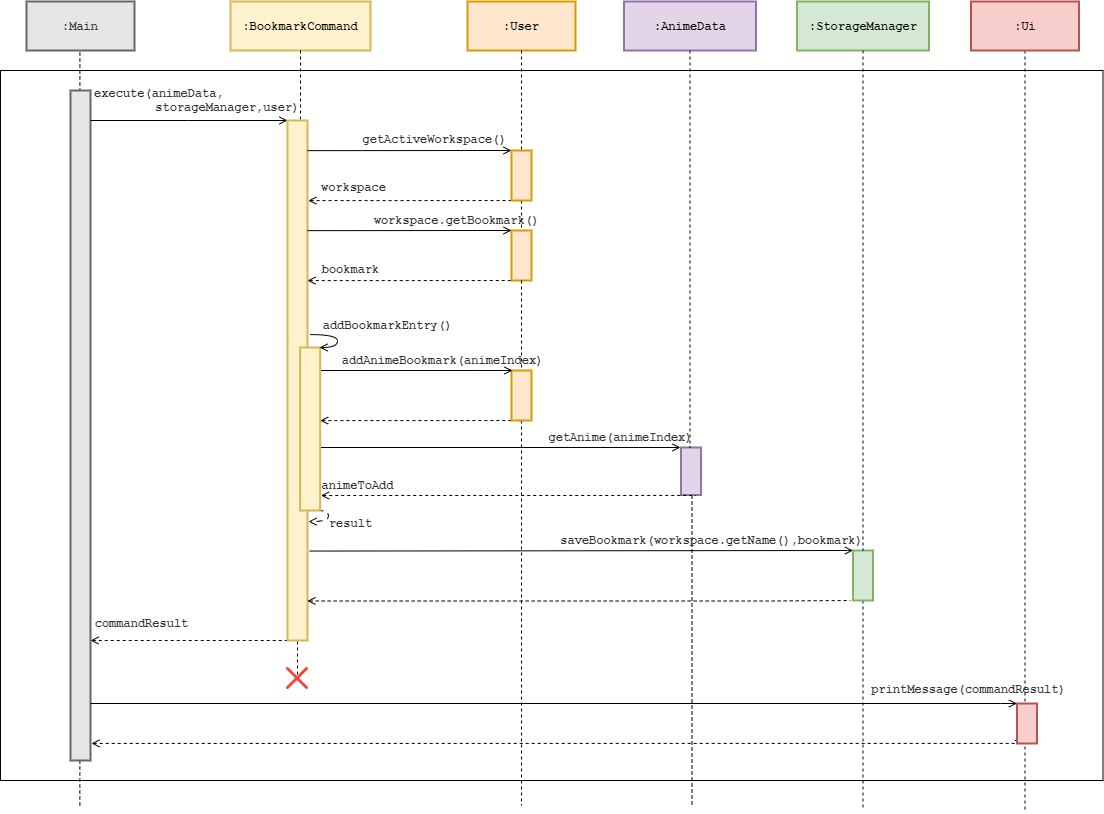
Figure 31: Bookmark Add Command Sequence Diagram
Step 5: The user executes bookmark -l command to list all anime within the bookmark. Bookmark#getListInString() will use the Anime index stored in the bookmark list and retrieve the anime name from AnimeData, the method then returns the bookmark index with the anime name.
Listing all anime in bookmark:
	1. To Heart 2
	2. Cowboy Bebop
	3. InuYasha the Movie 2: The Castle Beyond the Looking Glass
Step 6: The user executes bookmark -d 1 command to delete the bookmark entry at bookmark ID 1. Bookmark#deleteAnimeBookmark() will then remove the Bookmark index from the Bookmark.
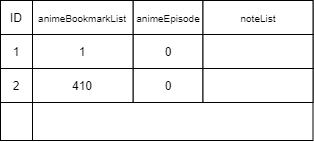
Figure 32: Bookmark Entries After Delete
Step 7: The user executes bookmark 1 -e 5 command to edit the episode for the first bookmark entry. Bookmark#editBookmarkEpisode() will change the episode field for that bookmark entry.

Figure 33: Bookmark Entries After Edit Episode
Step 8: The user executes bookmark 1 -n Schedule push back command to add a note for a bookmark entry. Bookmark#addNote() will then add a note to the bookmark entry at bookmark ID 1.
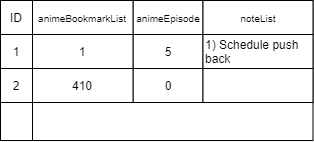
Figure 34: Bookmark Entries After Add Note
Step 9: The user executes bookmark 1 command to view all information of the first bookmark entry. The command will use Bookmark#getAnimeInfoFromBookmark() to retrieve the detailed anime info for the anime ID at that bookmark, Bookmark#getBookmarkEpisode() for the tracked episode by the user and Bookmark#getAnimeNotesFromBookmark() will retrieve all notes in a list format. With all the relevant information on the bookmark entry, the result will be displayed to the user (Figure 26: Bookmark Entries After Edit Episode).
Here is the information for that anime.
Index: 1
Name: Cowboy Bebop
Episodes: 26
Release Date: 03/Apr/1998
Rating: 86
Genre: [Action, Adventure, Drama, Sci-Fi]

Current Episode: 5

Notes for anime:
1. Schedule push back
Step 10: The user executes bookmark 1 -r 1 command to remove a note from the bookmark entry. Bookmark#removeNote() will remove the note ID 1 from the first bookmark entry. The resulting state of the remove note command will look exactly the same to the state before the note was added.
Figure 35: Bookmark Entries After Remove Note
4.9.2 Design consideration
This section describes the various design considerations taken when implementing the Bookmark feature.
Aspect: How should the bookmark entries be kept
The first design consideration was the data structure on how the bookmark entries should be maintained. The main issue here was the cohesiveness between the Bookmark object and the Workspace.
| Approach | Pros | Cons |
|---|---|---|
| Usage of three ArrayList to store anime index, Episode, and Notes. | - Easy to reference objects within ArrayList using its index and it is easy to implement. | - Require to synchronise the three ArrayList so the same index reference the components of the same bookmark entry. |
Use a BookmarkManager to handle bookmark features. |
- Do not need to maintain multiple ArrayLists. | - One extra layer of unnecessary abstraction (nesting), while introducing more coupling and dependency. |
While both approach have their own benefits, we have decided to use three ArrayList to keep the information of the bookmark entries. Considering the structure of how bookmark is within the workspace, we prefer to directly use the bookmark as the bookmark manager will create another layer of unrequired abstraction.
Aspect: How should bookmark entries keep anime information
The second design consideration was how to keep the reference to the Anime object. The main issue here was the storage and duplication of data.
| Approach | Pros | Cons |
|---|---|---|
| Keep only the anime index information within the bookmark. | - Easy to add and delete, which also simplifies the information to keep in offline storage. | - Bookmark Commands have to communicate with AnimeData for anime-related functionalities. |
Keep the entire Anime object in Bookmark. |
- Do not need to reference AnimeData for anime information. | - Keep a duplicate of anime data, requires synchronisation. - Hard to keep anime object information offline. |
We have decided to implement the first approach, the bookmark will keep the anime index within bookmark entries. Although the lookup for anime information of a bookmark entry requires a query to AnimeData, the management and offline storage of the bookmark entries will be more efficient (keeping only anime index). There are more considerations like synchronisation and duplication of the object data that comes with using Anime object.
5. Documentation, Logging, Testing, and DevOps
This section details the documentation, logging, testing and dev-ops setup used in this project as well as information on how to use them.
5.1 Documentation
We use Jekyll to manage documentation. We recommend that you document your feature implementations and code changes so that other developers are aware of its architecture.
The docs/ folder stores the documentation of this project. You can learn more about how to setup and maintain the project website using this guide.
5.2 Logging
We encourage the use of logger in this project as they provide deeper insights as compared to error messages which can greatly help developers identify bugs and simplify their logging process.
We are using java.util.logging package for logging. The logger can be accessed using the AniLogger class.
AniLogger is used to manage the logging levels and logging destinations. Based on the default settings, logs will be written to both console and file data/AniChan.log.
The Logger for a class can be obtained using AniLogger.getAniLogger(Class.class.getName()) which will log messages according to the specified logging level.
We use the following log levels:
-
Level.SEVERE: A critical failure, which prevents normal execution of the program. -
Level.WARNING: Indicates a potential problem, but can proceed with caution. -
Level.INFO: General noteworthy information of the program.
5.3 Testing
Testing is integral to the development of a reliable software. Before making a pull request, please ensure that all tests pass. You are recommended to write tests as you add new code to the program.
We employ both unit and integration tests for our codes. They are located in ./src/test directory.
5.3.1 Running Tests
There are primarily 2 ways to run the tests.
Method 1: Using IntelliJ
- To run all tests, right-click on the
src/test/javafolder in the project panel and chooseRun Tests.
Method 2: Using Gradle
- Open a terminal and navigate to project directory, run command
./gradlew clean checkstyleMain checkstyleTest test.
5.4 Development and Operations (DevOps)
We employ DevOps to ensure consistent release of good quality code and write-ups. These tools allow us to detect and mitigate bugs before they are merged to the repository.
5.4.1 Build Automation
This project uses Gradle for build automation and dependency management.
It automates tasks such as:
- Managing library dependencies.
- Analyzing code for style compliance.
- Running tests.
The gradle configuration file can be located in build.gradle.
5.4.2 Continuous Integration (CI)
We use GitHub Actions and Travis CI as our tool for Continuous Integration (CI).
Their configuration is complete and there is no need to modify them, these CI will automatically run checks on every commit to AniChan repository.
If you wish to modify these tools, you may find their configurations at:
-
GitHub Workflow:
.github/workflows -
Travis CI:
.travis.yml
5.4.2.1 Code Coverage
As part of CI, this project uses Codecov to generate coverage reports.
If you wish to configure Codecov for your fork, you may refer to Codecov Docs.
5.4.2.2 Repository-wide checks
In addition to running Gradle checks, CI includes some repository-wide checks. These checks include files from the entire repository and are useful in checking for rules which are hard to enforce on development machines such as line ending requirements.
These checks are POSIX shell scripts (i.e. platform dependent to Linux and macOS).
To run all checks, execute the following at project root ./config/travis/run-checks.sh.
If you wish to add new checks, simply add the check file with a filename check-* to the ./config/travis/ and the run-checks.sh script will automatically run it.
Appendix A: Product Scope
A.1 Target User Profile
- Professional anime translators.
- Works on multiple projects and with various companies.
- Has difficulty managing their time and information.
- Prefers command-line desktop applications.
- Able to type fast.
A.2 Value Proposition
- Helps the target user estimate the time needed to translate their scripts.
- Allows the user to organise work from different projects and companies into workspaces.
- Allows the user to write and refer to notes on different anime series while translating.
- Find relevant information regarding an anime series quickly.
- Organize anime into different watchlist for different genres.
- Portable and works offline.
Appendix B: User Stories
| Version | As a … | I want to … | So that I … |
|---|---|---|---|
| v1.0 | user | create new watchlist | can keep track of anime easily based on my defined criteria |
| v1.0 | user | add and remove an anime to a watchlist | can organise my anime into the defined criterion |
| v1.0 | forgetful user | find out all watchlist I have created | can find out what watchlist I have |
| v1.0 | user | save the data I have created | can remember what I have done |
| v1.0 | user | load the data I created previously | can continue to work on these data |
| v1.0 | new user | view all available commands | can easily find a specific command and its usage |
| v1.0 | user | be able to browse through all anime series | can easily see what anime are available |
| v1.0 | user | be able to sort my browsing session | will only browse through relevant data |
| v1.0 | freelance translator | be able to create new workspaces | can have a clear separation of my work at different companies |
| v1.0 | freelance translator | switch between workspaces | can swap my workspace to a specific company that my current project is tied to |
| v1.0 | forgetful user | bookmark specific anime | remember which anime I am currently interested in |
| v1.0 | forgetful user | set an episode for each bookmarked anime | can remember which episode I’m watching or translating |
| v2.0 | translator | write notes for a bookmark | can remember helpful information regarding a specific anime series |
| v2.0 | translator | remove notes for a bookmark | can remove outdated information or mistakes in my notes |
| v2.0 | user | view detailed information of a specific anime | can find out more about that anime series |
| v2.0 | user | be able to select a watchlist from my list of watchlist to use | can stay focused on working on one watchlist |
| v2.0 | user | delete watchlist that I no longer need | can keep my list of watchlist organized and up-to-date |
| v2.0 | translator | estimate the time needed to translate a script | can better manage and plan my time |
| v2.0 | user | search for a specific anime with a keyword | can find an anime series without remembering its full title |
| v2.0 | user | search for all anime in a genre | can find all similar types anime |
Appendix C: Non-Functional Requirements
- The application should work on major operating systems (OS) such as Windows and Linux that have
Java 11installed. - Users with fast typing speed should be able to accomplish tasks more easily and faster as compared to using mouse.
- The application should be easy to use with an accompanying User Guide and/or Developer Guide.
- The application should utilize memory resources efficiently.
- The application should be responsive.
Appendix D: Instructions for Manual Testing
D.1: Launch and Shutdown
Initial Launch
- Download the jar file and copy it into an empty folder.
- Open a new command prompt or terminal and navigate to the directory containing
AniChan.jar. - Enter the command
java -jar AniChan.jarto launch AniChan. - Program will prompt for
NameandGenderof user, thereafter AniChan will be ready for use.
Figure 36: AniChan’s Input Prompt
Shutdown
- To exit AniChan, enter the
exitcommand.
D.2: Estimate the time needed to translate a script
- Estimating the time needed to translate a script.
- Prerequisite: Have a non-empty
script.txtfile in the current workspace folder.- Create a
.txtfile and name it “script” such that the file name with the file extension isscript.txt, then fill it up with some content (i.e. random words and sentences). - Go to the folder containing
AniChan.jar. -
Open the
datafolder (if it does not exist, restart AniChan). - In the
datafolder, find and open the folder named after the current workspace (if the input prompt showsDefault (myWatchlist) #>, then look for the folder named “Default” as that is the current workspace name). - Move
script.txtinto this folder (i.e.data/Default/script.txt).
- Create a
-
Test case:
estimate script.txt.
Expected: 3 timings are generated and printed. -
Test case:
estimate script.txt -wph 550.
Expected: 1 timing is generated and printed. - Other incorrect commands to try:
-
estimate. -
estimate x(where x is not a.txtfile, is a file path, or consists of more than two files). -
estimate script.txt -wph x(where x is a negative number or a word).
-
- Prerequisite: Have a non-empty
script.txt, it is named as such for the convenience of testing.
D.3: Browse
- Utilising the
browsefeature.-
Prerequisite: None.
-
Test case:
browse
Expected: Will list 20 anime series according to the anime ID. -
Test case:
browse -s rating
Expected: Will list 20 anime series according to the most popular anime ratings. -
Test case:
browse -s rating -o asc
Expected: Will list 20 anime series from the lowest rated anime series (Ascending order). -
Other incorrect commands to try:
browse -s alpha-
browse -p x(where x is a negative number, a word, or an additional parameter.) browse -s name -s ratingbrowse ---browse -s rating-o asc
-
D.4: Search by name
- Finding an anime series with
searchfeature.-
Prerequisite: None.
-
Test case:
search -n Mushi
Expected: Will return anime with the keyword ‘Mushi’. In this case it would return ‘MUSHI-SHI’. -
Test case:
search -n MUSHI-
Expected: Will return anime with the keyword ‘MUSHI-‘. In this case it would return ‘MUSHI-SHI’. -
Other incorrect commands to try:
search-
search -n mush -n shiIn this case it would attempt to search formush -n shi, and return no results. search -n
-
D.5: Search by genre
- Finding all anime series that has a specific genre with
searchfeature.-
Prerequisite: None.
-
Test case:
search -g Music
Expected: Will return all anime that has ‘Music’ as its genre. -
Test case:
search -g slice of life
Expected: Will return anime that has ‘Slice of Life’ as its genre. -
Other incorrect commands to try:
search-
search -g musikIn this case it would attempt to search formusik, and return no results. search -g
-
D.6: Viewing the information of a specific anime
- Viewing the information of a specific anime.
-
Prerequisite: None.
-
Test case:
info 1
Expected: Lists out the information of the anime with index 1. -
Test case:
info 3
Expected: Lists out the information of the anime with index 3. -
Other incorrect commands to try:
info-
info x(where x is a negative number, zero, a word, or a number exceeding the number of anime in the database)
-
D.7: Create a new Workspace
- Create a new Workspace with
workspacefeature-
Prerequisite: None.
-
Test case:
workspace -n Crunchyroll
Expected: Workspace will be successfully created with success message. -
Test case:
workspace -n Crunchyroll__
Expected: Workspace creation will fail with error message stating names must be alphanumeric and spaces only.- Other incorrect commands to try:
workspaceworkspace -nworkspace -N
- Other incorrect commands to try:
-
D.8: Switch to a different Workspace
- Switch to a different Workspace with
workspacefeature-
Prerequisite: Workspace must first exist before switching to them. In this example we presume Workspace named
DefaultandCrunchyOreoexists and currently active Workspace is the former. -
Test case:
workspace -s CrunchyOreo
Expected: Workspace will be successfully switched fromDefaulttoCrunchyOreo. -
Test case:
workspace -s CrunchyOreo__
Expected: Workspace switch will fail given how the name request does not meet requirement of being alphanumeric and spaces only.- Other incorrect commands to try:
workspaceworkspace -sworkspace -S
- Other incorrect commands to try:
-
D.9: List all Workspace
- List all Workspace with
workspacefeature-
Prerequisite: Workspace must first exist to be able to list them. In this example we presume Workspace named
DefaultandCrunchyOreoexists and currently active Workspace is the former. -
Test case:
workspace -l
Expected: WorkspaceDefaultandCrunchyOreowill be listed.- Other incorrect commands to try:
workspace =l
- Other incorrect commands to try:
-
D.10: Delete a Workspace
- Delete a Workspace with
workspacefeature-
Prerequisite: Workspace must first exist before deleting them. In this example we presume Workspace named
DefaultandCrunchyOreoexists and currently active Workspace is the latter. -
Test case:
workspace -d Default
Expected: Workspace will be successfully deleted. -
Test case:
workspace -d default
Expected: Workspace deletion will fail given default does not exist.- Other incorrect commands to try:
workspaceworkspace -Dworkspace -dworkspace -d ..
- Other incorrect commands to try:
-
D.11: Creating watchlist
- Creating a watchlist with a unique name.
-
Prerequisite: None.
-
Test case:
watchlist -n newWatchlist.
Expected: A empty watchlist named “newWatchlist” is created, and a message indicating the watchlist was created successfully is printed. -
Other incorrect commands to try:
-
watchlist -n. -
watchlist -n x(where x is a watchlist name that is not unique in the current workspace, exceeds 30 characters, contains non-alphanumeric characters, or contain spaces only).
-
-
D.12: Listing all watchlist(s)
- Listing all created watchlist(s).
-
Prerequisite: None.
-
Test case:
watchlist -l
Expected: All watchlist entries in the current workspace is printed. -
Other incorrect commands to try:
-
watchlist -l x(where x is any additional parameters or values).
-
-
D.13: Selecting a watchlist to be the new active watchlist
- Selecting a watchlist to be the new active watchlist.
-
Prerequisite: The current workspace has at least 2 watchlist, and the first watchlist in the list is the active watchlist.
-
Test case:
watchlist -s 2
Expected: The second watchlist in the list becomes the new active watchlist, and a message indicating the name of the new active watchlist is printed. -
Test case:
watchlist -s 1
Expected: An error message indicating that the selected watchlist is already the active watchlist is printed. -
Other incorrect commands to try:
-
watchlist -s. -
watchlist -s x(where x is a negative number, a word, or an additional parameter).
-
-
D.14: Deleting a watchlist
- Deleting a watchlist.
-
Prerequisite: The current workspace has at least 2 watchlist, and the first watchlist is the active watchlist.
-
Test case:
watchlist -d 2
Expected: The second watchlist in the list is deleted, and a message indicating the name of the deleted watchlist is printed. -
Test case:
watchlist -d 1
Expected: The first watchlist in the list is deleted, and the first watchlist that is in the list after the deletion becomes the new active watchlist. Then, a message indicating the name of the deleted watchlist, and the name of the new active watchlist is printed. -
Other incorrect commands to try:
-
watchlist -d. -
watchlist -d x(where x is a negative number, a word, or an additional parameter).
-
-
D.15: Adding an anime to active watchlist
- Adding an anime to active watchlist.
-
Prerequisite: The active watchlist does not contain the anime to be added.
-
Test case:
add 1
Expected: The anime with index of 1 is added into the active watchlist, and a message with the name of the anime is printed. -
Test case:
add 3
Expected: The anime with index of 3 is added into the active watchlist, and a message with the name of the anime is printed. -
Other incorrect commands to try:
add-
add x(where x is a negative number, zero, a word, or a number exceeding the number of anime in the database)
-
D.16: Removing an anime from active watchlist
- Removing an anime from active watchlist.
-
Prerequisite: The active watchlist must contain at least one anime.
-
Test case:
remove 1
Expected: The first anime in the watchlist is deleted, and a message with the name of the anime is printed. -
Test case:
remove 3
Expected: The third anime in the watchlist is deleted, and a message with the name of the anime is printed. -
Other incorrect commands to try:
remove-
remove x(where x is a negative number, zero, a word, or a number exceeding the number of anime in the watchlist)
-
D.17: Viewing all anime in a specific or active watchlist
- Viewing all anime in a specific or active watchlist.
-
Prerequisite: The watchlist must contain at least one anime.
-
Test case:
view
Expected: Lists out the name of all anime in the active watchlist. -
Test case:
view 1
Expected: Lists out the name of all anime in the first watchlist. -
Other incorrect commands to try:
-
view x(where x is a negative number, zero, a word, or a number exceeding the number of watchlist)
-
-
D.18: Listing bookmark entries
- Listing bookmark entries.
-
Prerequisite: None.
-
Test case:
bookmark -l
Expected: All bookmark entries will be listed, if the bookmark list is empty then a bookmark empty message will be printed.
-
D.19: Adding a bookmark entry
- Adding a bookmark entry.
-
Prerequisite: Look up the anime ID using the
infocommand. The anime ID is inAnimeDatasource. -
Test case:
bookmark -a 1
Expected: The anime ID will be added as a bookmark entry, and a message indicating the name of anime is added to the bookmark. -
Test case:
bookmark -a 0
Expected: No anime is added to the bookmark. Error details show that anime ID cannot be 0. -
Other incorrect commands to try:
bookmark -a-
bookmark -a x(where x is a negative number, a word, or an additional parameter)
-
D.20: Deleting a bookmark entry
- Deleting a bookmark entry.
-
Prerequisite: List all bookmark entries using the
bookmark -lcommand. Multiple bookmark entries in the list. -
Test case:
bookmark -d 1
Expected: The bookmark ID will be deleted from the bookmark, and a message indicating the name of anime deleted from the bookmark. -
Test case:
bookmark -d 0
Expected: No bookmark entry is deleted from the bookmark. Error details show that bookmark ID cannot be 0. -
Other incorrect commands to try:
bookmark -d-
bookmark -d x(where x is a negative number, a word, or an additional parameter)
-
D.21: Editing a bookmark entry episode
- Editing a bookmark entry episode.
- Prerequisite:
- List all bookmark entries using the
bookmark -lcommand. Multiple bookmark entries in the list. - View the information of bookmark entry using
bookmark <BOOKMARK_ID>. The total episode of the anime series.
- List all bookmark entries using the
-
Test case:
bookmark 1 -e 1
Expected: The bookmark episode for that ID will be edited to 1, and a message indicating the anime current episode has been edited. -
Test case:
bookmark 0 -e 1
Expected: No bookmark entry will have its episode edited. Error details show that bookmark ID cannot be 0. - Other incorrect commands to try:
bookmark -e-
bookmark -e x(where x is a negative number, a word, or an additional parameter) -
bookmark x -e(where x is a negative number, a word, or an additional parameter) -
bookmark x -e x(where x is a negative number, a word, or an additional parameter)
- Prerequisite:
D.22: Adding a note to a bookmark entry
- Adding a note to a bookmark entry.
-
Prerequisite: List all bookmark entries using the
bookmark -lcommand. Multiple bookmark entries in the list. -
Test case:
bookmark 1 -n test
Expected: The note will be added to bookmark ID, and a message indicating the note has been edited for that anime. -
Test case:
bookmark 0 -n test
Expected: No bookmark note will be added. Error details show that bookmark ID cannot be 0. -
Other incorrect commands to try:
bookmark -n-
bookmark -n x(where x is a negative number, a word, or an additional parameter) -
bookmark x -n(where x is a negative number, a word, or an additional parameter) -
bookmark x -n x(where x is a negative number, a word, or an additional parameter)
-
D.23: Removing a note from a bookmark entry
- Removing a note from a bookmark entry.
-
Prerequisite: View the information on bookmark entry using ‘bookmark
'. Multiple notes for that bookmarked anime. -
Test case:
bookmark 1 -r 1
Expected: The first note of the bookmark entry will be removed, and a message indicating the note has been removed from the anime. -
Test case:
bookmark 0 -r 1
Expected: No notes will be removed. Error details show that bookmark ID cannot be 0. -
Other incorrect commands to try:
bookmark -r-
bookmark -r x(where x is a negative number, a word, or an additional parameter) -
bookmark x -r(where x is a negative number, a word, or an additional parameter) -
bookmark x -r x(where x is a negative number, a word, or an additional parameter)
-
D.24: View information of a bookmark entry
- View information of a bookmark entry.
-
Prerequisite: List all bookmark entries using the
bookmark -lcommand. Multiple bookmark entries in the list. -
Test case:
bookmark 1
Expected: All information on a bookmark entry will be printed. -
Test case:
bookmark 0
Expected: No bookmark entry information is displayed. Error details show that bookmark ID cannot be 0. -
Other incorrect commands to try:
-
bookmark -d x(where x is a negative number, a word, or an additional parameter)
-
-